How to Start Seeds Indoors and Grow Healthy Seedlings Every Time
A simple, step-by-step guide to strong, healthy plants from seed—no guesswork required.
Starting seeds indoors is one of the most reliable ways to grow strong, productive plants—especially in early spring. Whether you’re growing vegetables, herbs, or flowers, success comes down to a few key factors: proper timing, consistent moisture, adequate light, and gradual transition outdoors.
This guide walks through exactly how to grow healthy seedlings from seed, using simple methods that work for beginners and experienced gardeners alike. By following these steps and understanding why they matter, you can avoid common problems and raise sturdy plants ready for the garden.
Timing is everything. Most seeds should be started indoors 6 to 10 weeks before your area’s last frost date. This ensures seedlings are the right size for transplanting when outdoor conditions are suitable.
Step 1: How to Set Up Your Seed-Starting Area
To get started, you’ll need seeds and some basic equipment. Set up your seed-starting shelf in a dry location that stays between 65 and 75°F. Soil temperature matters more than air temperature for germination, and some warm-season crops (like tomatoes and peppers) prefer soil closer to 70–80°F.
The shelf doesn’t need to be near a window, though some natural light can help early growth.
Prepare a schedule based on your last frost date. Check your seed packet for days to maturity and recommended indoor start timing. Most varieties are started 6–10 weeks before the last frost. Working backward from that date ensures your seedlings are ready to transplant at the right time.
Step 2: How to Premoisten Seed-Starting Mix
Fill a plastic tub halfway with seed-starting mix and wet the surface using a gentle spray. Use your hands to mix thoroughly, pulling material from bottom to top in a circular motion.
Continue mixing and spraying until the soil feels like a wrung-out sponge—moist but not dripping. When squeezed, it should release just a drop or two of water.
Proper moisture is critical. Soil that is too wet can lead to fungal problems, while dry soil prevents seeds from germinating evenly.
Step 3: How to Level and Prepare Soil for Seeds
Level the soil across your tray, then gently lift and drop the tray to settle it. Refill any low spots and smooth the surface.
The goal is a balance: firm enough to hold moisture and allow water movement, but loose enough for roots to grow easily.
Related: Preparing Garden Soil in Spring: When and How to Get Beds Ready for Planting
Step 4: How Deep to Plant Seeds
Use a chopstick or similar tool to make a small hole in each cell. A general rule is to plant seeds at a depth of 2 to 3 times their size.
Some seeds require light to germinate and should be left on the surface rather than covered. Always check the seed packet for specific instructions.
Starting extra seeds allows you to select the strongest seedlings later.
Step 5: How to Plant Seeds in Trays
Place one seed in each hole. Gently close the soil over the seed and press lightly to ensure good soil contact.
Consistent contact between seed and soil helps maintain moisture and improves germination rates.
Step 6: How to Label Seedlings Correctly
Label each variety clearly using plant markers or similar tools. This prevents confusion later when seedlings begin to look similar.
Place trays on heat mats if needed and set them inside leakproof bottom trays.
Related: How to Grow Broccoli: A Complete Guide to Planting, Care, and Harvest
Step 7: How to Water Seedlings Properly
Mist the trays and cover them with a humidity dome to retain moisture during germination. Check daily—the soil should remain dark and moist, but never soggy.
Overly wet conditions can lead to damping off, a fungal disease that causes seedlings to collapse at the base.
Once most seeds have sprouted, remove the dome and heat mat. Heat mats are useful for germination but can stress seedlings after sprouting.
Switch to bottom watering by adding about ½ inch of water to the tray. Allow the soil to absorb moisture from below, then let it dry slightly before watering again. This helps prevent disease and encourages strong root growth.
Step 8: How to Use Grow Lights for Seedlings
Position grow lights about 3 to 6 inches above the seedlings and keep them on for 14 to 16 hours per day. Turn them off at night—plants need a dark period to grow properly.
The exact distance depends on your light type. LED lights can often be closer, while fluorescent lights may need slightly more space.
If seedlings become tall, thin, and weak, they are “leggy.” This is caused by insufficient light. Move lights closer or increase intensity to correct the problem.
If leaf tips turn brown or crispy, the lights may be too close.
As seedlings grow, continue adjusting the lights to stay just above the tallest plants.
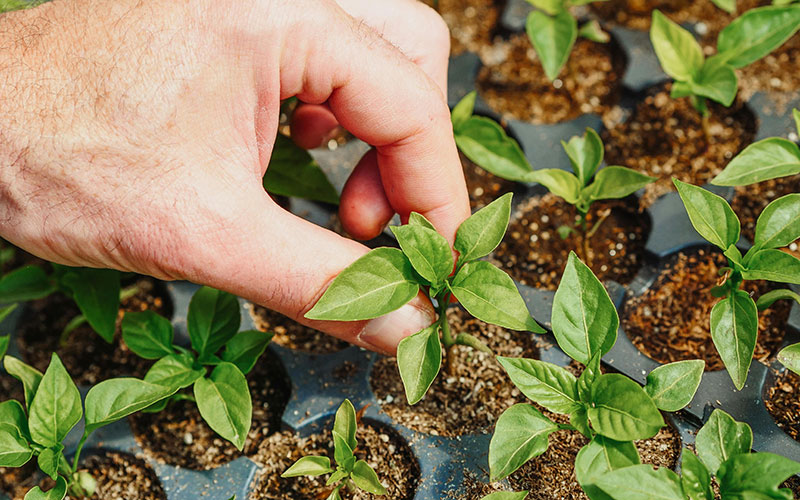
Step 9: When and How to Transplant Seedlings
Remove seedlings once they develop two or three sets of true leaves. True leaves are the first leaves that resemble the mature plant, appearing after the initial seed leaves.
Cool-season crops like lettuce and onions can often go directly into the garden. Warm-season crops like tomatoes should be moved into larger containers and kept indoors until after the last frost.
Seed-starting mixes contain little nutrition, so begin feeding once true leaves appear. Use a diluted organic liquid fertilizer to support steady, healthy growth.
Step 10: How to Harden Off Seedlings Before Transplanting
Before moving plants outdoors permanently, they need to adjust to sunlight, wind, and temperature changes. This process is called hardening off.
Start by placing seedlings outside in a sheltered, lightly shaded area for 1–2 hours. Increase exposure by about one hour each day.
Gradually introduce more direct sunlight over several days. Wind exposure is just as important as light—it helps strengthen stems.
This process usually takes about 7 to 10 days. Skipping it can lead to transplant shock, where plants struggle or fail after being moved outdoors.
Seed Starting Troubleshooting Guide
Seeds Not Germinating
If seeds fail to sprout, the most common causes are incorrect temperature, inconsistent moisture, or old seeds. Check packet recommendations and ensure soil stays evenly moist.
Leggy Seedlings
Leggy growth is caused by insufficient light. Lower your grow lights or increase brightness to produce compact, sturdy plants.
Mold or Fungal Growth
White fuzz on soil is usually caused by excess moisture and poor airflow. Improve ventilation and allow the soil surface to dry slightly between watering.
Yellowing Leaves
Yellow leaves can indicate overwatering or lack of nutrients. Check drainage and begin light fertilization if true leaves have formed.
Seedlings Falling Over (Damping Off)
Damping off is a fungal disease that causes seedlings to collapse suddenly. Prevent it by avoiding soggy soil, using clean containers, and providing airflow.
Final Thoughts on Growing Seedlings Successfully
Starting seeds indoors becomes easier with each season. With the right setup and attention to light, water, and timing, you can consistently grow strong, healthy plants ready for the garden.
Small adjustments—like improving airflow, dialing in moisture, or adjusting light distance—make a big difference. Once you understand the process, seed starting gives you more control, better plant selection, and a stronger start to the growing season.